
What to Cook in May
What to Cook in May
Let’s go on a picnic: Salad in Jars, Spring Potato Salad, Oven Fried Chicken, Ligurian Focaccia, Banana Bread and The Irish Bakery Cookbook

We’re halfway through May. How did that happen? I can’t seem to keep up and I know I’m not the only one. Luckily for you, these “May” recipes will take you through the next several months, so there’s no immediate rush to jump on them.
Welcome to the beginning of the best cooking season: Vegetables that aren’t squash! Fruits! Greens! Herbs! Are you excited? I am.
I’ve got some recipes to kick off the almost-summer fun. The cool spring around here (Boston) has gifted us with lots of happy flowers that are sticking around. Even the lilacs are lasting a whole week before drooping from an onslaught of heat. No, it hasn’t been exactly picnic weather, but we’re getting there. These should get you in the mood.
Greek Salads in Jars
Salads in a jar have to be the best thing since sliced bread. Taking a salad on a picnic or to work is fussy. Small containers for dressing that don’t leak, if you can find them, are easy to lose, and let’s face it, kind a pain to keep track of. Problem solved with salads in jars.
The main concept is to put the dressing and the juiciest ingredients on the bottom of the jars, and top with the more delicate ingredients and greens. The dressing stays on the bottom, and the other ingredients stay crisp and fresh. The salads will even keep for two days (sometimes longer) in the refrigerator. If you’re a morning person but fade at 6:00 p.m., put them together during the day when you’re puttering. They’ll be waiting for you when you don’t even have the bandwidth to make a salad.
Greek salads in Greece are very simple: tomatoes, olives, onions, cucumbers, feta cheese and sometimes peppers. Greeks in American sub shops and pizza parlors have adapted the salad to our tastes by adding greens and other ingredients. There is no reason why you can’t do the same or leave well enough alone and skip the greens.
Think of this recipe as blueprint and improvise as you please. Add-ins like leftover shredded chicken or cooked chickpeas and other beans add more substance. Radishes, avocados, and other seasonal cooked vegetables could be thrown in too, making good use of leftovers. Or stick to the basic five or six ingredients and stuff them into pita pockets for a Greek salad sandwich.
The ingredients here are enough to make 4 salads. They expand in the bowl or on the plate, so each jar is plenty for one serving. You could also layer them in larger jars and have a big salad ready to serve when you get home from work, or to take on a picnic with a bigger bowl to toss everything together. When the weather is fine, put some bowls, forks, napkins, and pita bread in your basket with the salad in jars, and a head out to the beach or park. Summertime!
Greek Salads in Jars Recipe
DRESSING
3 tablespoons red wine vinegar
1/4 teaspoon salt
Pinch black pepper
1/4 teaspoon dried oregano
1 teaspoon honey
5 tablespoons olive oil
1. In a small bowl, whisk together the vinegar, salt, pepper, oregano and honey.
2. Gradually whisk in the oil. Taste and add more salt and pepper if you like.
SALAD
1/4 red onion, thinly sliced
1/2 pint cherry tomatoes, halved
1/2 large English cucumber, sliced
1 yellow or orange pepper, cut into 1/2-inch pieces
3/4 cup pitted California olives
1/2 cup (4 ounces) crumbled feta
4 small handfuls fresh baby spinach or other dark leafy greens of choice
4 pita bread rounds, halved (for serving)
1. Have on hand 4 pint-size canning jars with lids.
2. In each of the jars, place 1/4 of the onions. Pour about 1 1/2 tablespoons of the dressing over the onions. (The onions will marinate in the dressing, which will keep them from overpowering the salad.)
3. To each jar, add 1/4 of the tomatoes. Top with 1/4 of the cucumbers, 1/4 of the olives, 1/4 of the peppers and 1/4 of the feta. Place a handful of greens on top and compress them slightly. Secure the lids and refrigerate for up to 2 days. Transport upright in a cooler.
4. To serve: Empty each of the jars into 4 bowls and toss with the dressing. Serve with pita bread.
Spring Potato Salad with Asparagus
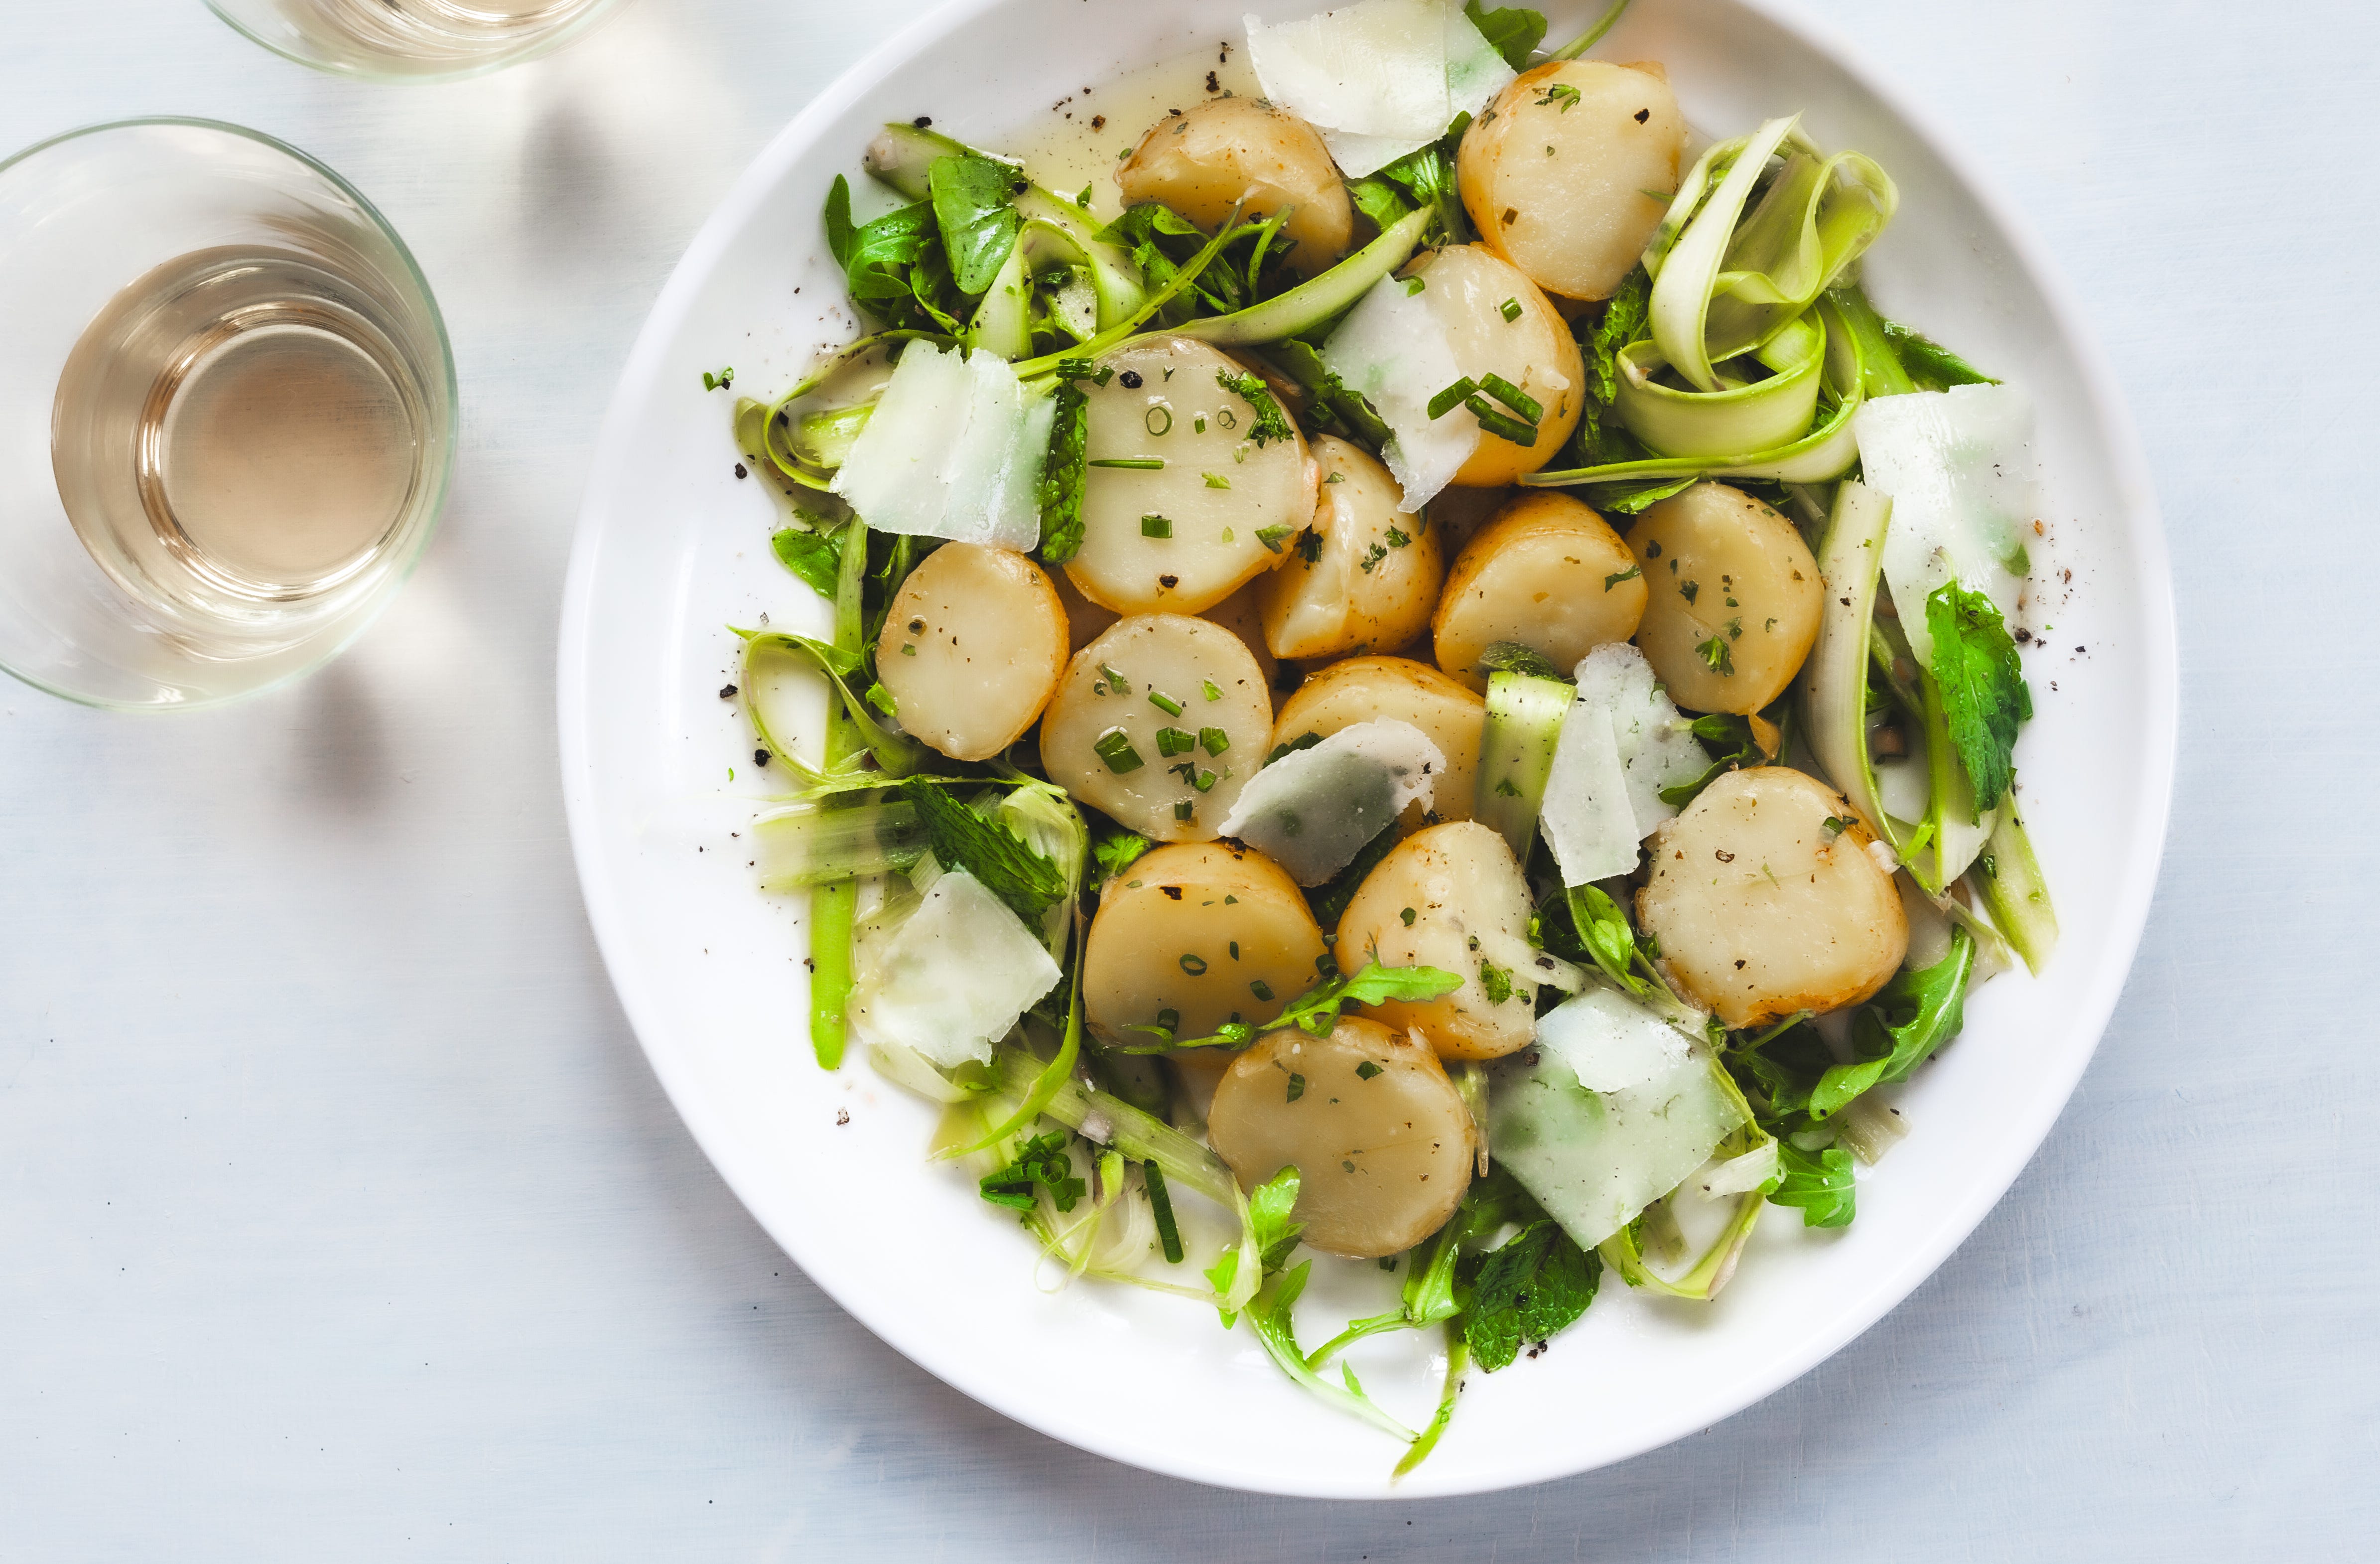
It’s time to add potato salad to the menu again. There’s plenty of time for summer salads, but this one celebrates spring in the most delicious way with small, steamed potatoes, shaved asparagus, mint, parsley, and chives bathed in a lemon dressing. Get out your steamer and cook the potatoes in a scant amount of water to render them tender with firm, beautiful flesh. As soon as you can touch them without burning your fingers, slice them in half and drop them into a bowl with about two thirds of the dressing. Shake the bowl to toss them in the dressing, and they’ll absorb all the good flavors as they cool. Meanwhile, use a vegetable peeler to shave thick asparagus stalks into ribbons. Their fresh taste comes alive in the lemony dressing. Arrange all the greens and potatoes on a platter and have a spring feast. You might be skeptical about raw, shaved asparagus, but I guarantee you’re going to love these pops of freshness. We’ve waited long enough.
Spring Potato Salad with Shaved Asparagus Recipe
Serves 4
1 1/2 pounds small yellow potatoes
3 tablespoons lemon juice
1 tablespoon sherry vinegar or white wine vinegar
1 small shallot, finely chopped
Salt and pepper, to taste
1/4 cup olive oil
2 tablespoons finely chopped parsley
2 tablespoons finely chopped chives
1/2 pound thick asparagus (about 8 spears)
1 handful of baby arugula
1/4 cup mint leaves
Olive oil, for sprinkling
Chunk of pecorino Romano, for shaving
1. Fit a soup pot with a steamer insert. Add 2 inches of water to the pot. Place the potatoes on the steamer rack and bring the water to a boil. Cover with a lid and steam for 12 to 16 minutes, or until the potatoes are tender when pierced with a skewer.
2. Meanwhile, in a bowl large enough to hold the potatoes, combine the lemon juice, vinegar, shallots, salt, and pepper and let stand for 5 minutes. Whisk in the olive oil, parsley, and chives.
3. Scoop out 2 tablespoons of the dressing and place it in another bowl large enough to hold the asparagus and arugula.
4. Lift the potatoes out of the pot and transfer to a rimmed baking sheet. Spread them out and leave them until they are cool enough to handle. Slice in half and add to the dressing in the large bowl. With a rubber spatula, fold the dressing and potatoes together.
5. Cut off and discard about 1-inch from the tough bottom ends of the asparagus spears. To shave the spears into ribbons: Set a spear on the cutting board and grasp the bud end. Using a vegetable peeler, cut from the bud to the bottom of the spear until the spear is too thin to shave. Transfer the shavings to the other bowl of dressing. Add the arugula and mint and toss gently. Taste for seasoning and add more salt and pepper if you like.
6. Arrange the potatoes on a platter and tuck in the asparagus ribbons, arugula, and mint. Sprinkle with olive oil. Use a vegetable peeler to shave thin shards of pecorino over the salad.
Oven Fried Chicken

Take this devilishly delicious and slightly spicy oven-fried chicken to the beach, on a hike, or to your favorite park. The chicken takes only a little time to prepare and avoids the mess of deep-frying. Although the pieces do not have the hard crunch of deep-fried chicken, the crust is full of flavor. The breading is subtly spicy, but if you like yours hotter, add an extra pinch of cayenne. First marinate chicken thighs, drumsticks, and breasts in buttermilk and sriracha, then dredge them with breadcrumbs and flour, and finally spray it all over with vegetable oil spray (olive oil if you can find it), getting into all the crevices and thoroughly coating the pieces. They go into a hot oven for about half an hour and then get a quick turn under the broiler to add a little crispness. Oven-fried chicken keeps in the fridge for two to three days (if it lasts that long). Pack the chicken in your picnic basket, and don’t forget the napkins.
Oven Fried Chicken Recipe
Makes 12 pieces or enough to serve 6
Vegetable oil spray
1 1/2 cups buttermilk
3 tablespoons sriracha
2 tablespoons Dijon mustard
2 teaspoons salt
1/2 teaspoon black pepper
4 bone-in chicken thighs (skin intact)
4 chicken drumsticks
2 split bone-in chicken breasts (skin intact), halved horizontally to make 4 pieces total
1 1/2 cups unseasoned fine, dry breadcrumbs
1 1/2 cups flour
3/4 teaspoon cayenne pepper
Paprika (for sprinkling)
1. Heat the oven to 400 degrees. Line 2 rimmed baking sheets with foil and spray with vegetable oil spray. Have on hand a large wire rack and a sheet of parchment to put under it.
2. In a bowl large enough to hold all the chicken pieces, whisk the buttermilk, sriracha, mustard, 1 teaspoon of the salt, and black pepper. Add the chicken thighs, drumsticks, and breasts and turn to coat them in the marinade. Set aside for 10 minutes (or refrigerate for up to 8 hours).
3. In another large bowl, whisk the breadcrumbs, flour, the remaining 1 teaspoon salt, and cayenne to blend them.
4. With tongs, remove a piece of chicken from the buttermilk and tap the tongs against the side of the bowl to let the excess liquid fall back into the bowl. Dredge the chicken on all sides in the breadcrumb mixture. Set the chicken skin side up on one of the baking sheets. Repeat with the remaining chicken pieces, dividing them between the sheets. Sprinkle lightly with paprika. Spray with vegetable oil spray, coating the pieces in all the nooks and crannies.
5. Bake the chicken for 20 minutes, switching the position of the pans from back to front or top to bottom. Continue baking for 10 minutes, or until a meat thermometer inserted into the thickest of the chicken registers 165 degrees.
6. Remove the pans from the oven. Turn on the broiler and set a rack about 8 inches from the element. Broil the chicken for 1 to 2 minutes on each side, watching it carefully, or until you see the oil on the coating bubble. Set the wire rack on the parchment paper. Transfer the chicken to the rack to cool completely before refrigerating.
Ligurian Onion and Rosemary Focaccia

There are several ways to make the popular Italian flatbread focaccia. Who knew? The one we are accustomed to is usually made with pizza dough that is dimpled, doused with olive oil and allowed to rise long enough to form a thick flatbread when it is baked. This focaccia is Ligurian-style, from the area around Genoa in northwestern Italy. It is made with a soft, sticky dough that does not require kneading. Instead, it rises overnight at room temperature, then it’s pressed into a well-oiled pan, dimpled with the tips of your fingers, and covered with a brine (a mixture of warm water and kosher salt) and more olive oil. The result is a light, fluffy bread with a delightfully crunchy, crisp exterior, infused with the flavor of good olive oil.
When you make this recipe, measure the ingredients carefully; for instance, some of the olive oil goes into the dough and some goes on top later after it rests overnight. You have many choices for toppings: fresh herbs, pesto, tomatoes, olives, feta, or sautéed onions. Anything that goes on pizza is a good idea (hold the pineapple). Since the baked focaccia is about two inches high and soft inside, you can slice the squares horizontally and make sandwiches stuffed with tomatoes and mozzarella. You can also bake the dough without a topping, just rosemary and salt. Focaccia is best eaten on the day it is made, but you can reheat leftovers in a 300-degree oven for 10 minutes. One of the many benefits to an overnight rise is that you have little fuss on baking day. Take this focaccia outside with a plate of charcuterie for a backyard picnic on a warm spring night. This is the moment to use that special bottle of olive oil you’ve been saving for an occasion. You can taste the difference.
Ligurian Onion and Rosemary Focaccia Recipe
Makes 12 squares
DOUGH
3 ½ cups flour
½ teaspoon instant yeast
2 ½ teaspoons kosher salt
1 ½ cups lukewarm water
9 tablespoons best-quality olive oil
1. In a large bowl, whisk the flour, yeast, and 2 teaspoons of the kosher salt to blend them.
2. Add 1 1/4 cups of the water and 4 tablespoons of the oil. Stir with a rubber spatula until well incorporated. Scrape down the sides of the bowl to form a loose ball.
3. Sprinkle 1 tablespoon of the oil over the dough. With your hand, pat the oil all over the top. Cover with plastic wrap. Leave to rise at room temperature for 12 to 14 hours, or until it has at least doubled in volume.
4. Have on hand a quarter-sheet pan or a 9-by-13-inch baking pan. Add 2 tablespoons of the oil to the pan and tip it so the bottom and sides are coated.
5. Tilt the bowl of dough over the baking pan and with one hand, coax the dough onto the pan. With both hands, gently push and stretch the dough towards the edges of the pan until it fills the pan to the corners. At first the dough will shrink and snap back to its original size. Let the dough rest for 10 to 15 minutes and stretch it again.
6. In a measuring cup, stir the remaining 1/4 cup water and remaining 1/2 teaspoon salt until the salt dissolves. This is your brine. Use your fingers, to dimple the dough at a deep angle all over. Don’t be afraid to press hard. Sprinkle the brine all over the dough, then sprinkle it with 2 tablespoons of the olive oil, letting it fill the dimples.
7. Set the dough in a warm place to rise for 45 to 60 minutes, or until it is puffed and bubbly.
TOPPING
1 tablespoon best-quality olive oil
1 medium onion, halved and thinly sliced
2 tablespoons chopped fresh rosemary
Pinch of black pepper, or more to taste"
Pinch of flaky sea salt, or more to taste
1. Heat a skillet over medium-high heat until hot. Add the oil and the onions. Cook, stirring occasionally, for 4 to 5 minutes, or until the onion softens and starts to brown. Remove from the heat. Stir in 1 tablespoon of the rosemary and a pinch or two of pepper.
2. Adjust an oven rack to the middle position. Place a pizza stone or an inverted sheet pan on the rack. Set the oven at 450 degrees.
3. Spread the onions evenly over the dough and sprinkle with the remaining 1 tablespoon rosemary and a pinch or two of flaky sea salt. Set the pan on the hot baking stone or sheet pan. Bake for 30 minutes, or until the bottom crust is browned and the top is deep golden brown. Use a thin metal spatula to peek under the dough to check it. Let the focaccia cool for 5 minutes in the pan, then use a thin metal spatula to release the sides and bottom. Transfer immediately to a wire rack to keep it from becoming soggy.
4. Cut the focaccia into squares and serve warm or at room temperature.
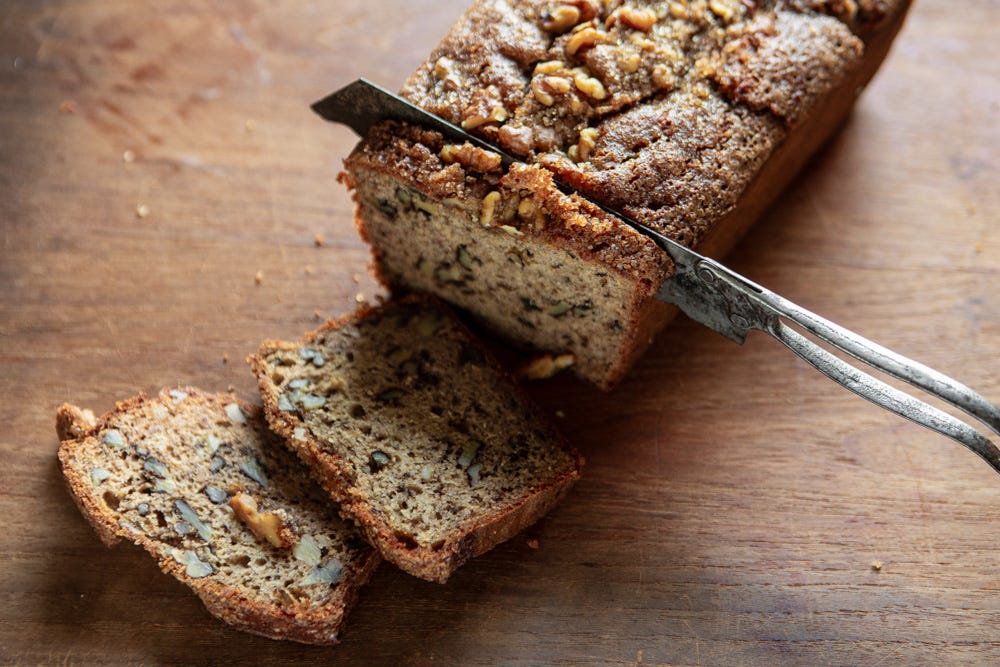
The World’s Best Banana Bread, Endlessly Updated
I’ve been making banana bread for years, and my recipe has had many delicious permutations since the beginning. The word "best" is always subjective, and I modestly claim this one is it. And it has been my favorite ever, forever.
Until.
I recently borrowed a copy of The Irish Bakery from a friend, a cookbook by Cherie Denham with stunning photographs by Andrew Montgomery. I don’t know which feast is better: the recipes or the photos. I am lost in it, clinging to the book, keeping it by my bedside (weird, right?), soaking up the photos, feeling at once inspired and frustrated that I am so slow in my photo journey. I need another lifetime! All in all, it’s a beautiful book, and one I am eagerly awaiting for delivery. (For now, it is only available on UK Amazon, but you can buy it directly from the publisher.)
I want to bake everything in the book! Last weekend I had bananas calling to me; there’s no way we would be able to get to them before they were overripe. I was in a hurry to figure out what to take to a party that Sunday. Cherie’s recipe looked very much like mine: whole wheat flour, both butter and oil, along with a minimal amount of sugar in the batter made it basically risk-free to try without worry. Her genius, which I borrowed to make my own recipe’s most recent incarnation that follows, was to make the batter in a food processor (have you got five minutes? I bet you do.)
I don’t want to steal her recipe outright without asking first (still in a hurry) but I should add that she coated the inside of her loaf pan and the top of the loaf with Demerara sugar (turbinado or coarse cane will do). Again, genius with a crunch on top. I hope to follow this up with her recipe to share with you. To be continued.
In the recipe below, olive oil gives the loaf a moist texture and butter adds a sweet, creamy note. Bananas that are teetering on the brink of overripe or those you've stashed in the freezer have a home here. Defrost frozen bananas at room temperature. If you don't have these exact ingredients, you can adapt. Don't worry! You can replace whole-wheat flour with all-purpose; use allspice, five-spice powder, or cinnamon instead of nutmeg; Greek yogurt when you're out of sour cream. Do you have molasses but no brown sugar? Add a teaspoon or two of molasses to granulated sugar, or just use all granulated. When you're running low on butter, use oil instead (here that would be 6 tablespoons olive or vegetable oil). Pecans or hazelnuts would also be good instead of walnuts, or just leave out the nuts. And if you want to go all out, throw in a handful of chocolate chips for an extra bonus. No picnic is complete without cake. And thank you, Cherie Denham, for your beautiful book and your banana bread. I haven’t put both of our versions head-to-head (it’s not a competition) but I think I might like yours a wee bit more. Like I said, to be continued….
Best Banana Bread Recipe (Umpteenth Version)
Makes one 9-by-5-inch loaf
INGREDIENTS
Butter (for the loaf pan)
3 ripe bananas, cut into 2-inch chunks
1/2 cup sour cream or Greek yogurt
3/4 cup light or dark brown sugar
2 large eggs
2 tablespoons softened unsalted butter
1/4 cup olive oil or vegetable oil
2 teaspoons vanilla extract
3 tablespoons strong coffee, at room temperature
1 cup all-purpose flour
3/4 cup whole wheat flour
1 1/2 teaspoons baking powder
1/2 teaspoon baking soda
3/4 teaspoon salt
1/2 teaspoon nutmeg
1 1/4 cup walnuts, coarsely chopped, plus a few more for garnish
METHOD
1. Set the oven at 350 degrees. Butter a 9-by-5-inch loaf pan. Line the bottom and 2 long sides with parchment paper cut to fit it, leaving a generous overhang.
2. In a food processor, pulse the bananas until smooth (a few small lumps are okay.) Add the sour cream or yogurt, brown sugar, eggs, butter, oil, and vanilla extract. Pulse until smooth. Add the all-purpose flour, whole wheat flour, baking powder, baking soda, salt, and nutmeg to the bowl. Pulse until the ingredients are incorporated into a smooth batter. Add 1 cup of the walnuts and pulse just to mix them.
3. Pour the batter into the loaf pan and smooth it with the back of a spoon. Sprinkle the remaining walnuts down the center of the loaf.
4. Bake the bread for 60 to 70 minutes, or until a toothpick inserted into the center of the loaf comes out clean (205 to 210 degrees on a thermometer inserted into the center of the loaf.) Check at the 50-minute mark and cover loosely with foil if the bread is brown enough. Remove from the oven and cool in the pan for 10 minutes. Using the parchment paper as handles, lift the loaf out of the pan, remove the paper, and set the cake on a rack to cool completely.
It’s rainy and gray with cool temperatures today, but I’m envisioning warm and sunny weather, a picnic basket and a day at the beach. I hope you’ll get yours soon.
Until next time…
XXOO
Sally
Thanks for reading, sharing, and subscribing. And if you enjoyed this post, please click on the little ❤️ below ⬇️. Thanks again for being here!