
The Pie Installment, vol. 1
The Pie Installment, vol. 1
Let’s nail down American-style pie dough for the holiday and beyond!

Happy almost July Fourth!
We’ve been through the ringer the past few years, and it’s non-stop. I want to say wake me when it’s over, but that strategy has never worked in the past. In the meantime, I’m going to make a pie. It will not fix the world’s problems, but it will make everybody’s day sweeter. And what could be more all-American than a slice of pie on July 4th?
Before I dive into the geeky details, I should tell you that I have literally made thousands of pies. I started baking when I was demoted from line cook to pastry chef by our friendly neighbor/mentor—French chef Eugene Bernard —who believed women did not belong behind the line. He anointed one of the young male cooks by inviting him to do a stage at his very fancy restaurant in New York City. When the cook returned, I became persona non grata in the kitchen. I went downstairs to the ‘bakery.” The restaurant was in Upstate New York, near Woodstock, and it had a room in a walkout basement with windows overlooking a mountain stream, which as compensation for my demotion, served as surreptitious cold plunges on hot summer days. It also had a twelve-foot marble table acquired from an old restaurant, a pizza oven, and a big stand-mixer on the floor that could easily accommodate a toddler or two.
We mixed dozens of loaves of bread at a time in the mixer for sandwiches and to sell to restaurant customers. We also made pie dough in five-gallon batches. First, we stirred flour, salt, sugar, and butter cubes (using the butter pats we served in the dining room) with the paddle attachment until the butter was in even smaller pieces. It went into a giant bucket and lasted a week in the walk-in refrigerator. When it came time to make a pie, we’d scoop out the pastry mix and add water to make the dough. Voila! Pies all day, every day.
I’ve pretty much stuck with the spirit of that formula to this day, but I should warn you, I have incessant impulses to tweak and ‘improve’ on my recipes. Some people cannot leave well enough alone. You can skip to the recipes and forego the following details, but you signed up for this, so don’t be hating.

The recipes in this post: I’m giving you two types of American style pie dough because America’s having a birthday. You’ll also learn how to blind bake a pie shell and a good old-fashioned apple pie. More later on those handy galettes and crostatas
I told you I can’t leave well enough alone. You can make the dough in a food processor and it’s going to give you great results. Or you can go the distance with an extra-flaky, extra-fussy version, where you pinch the butter cubes with your fingers to flatten them, roll out the dough and fold it. I neglected to give instructions for blind baking (for fully baked pie shells) in The Blueberry Cookbook, a sad omission, but I’ll tell you how below.
General Pie Dough Rules
1. Keep ingredients cold. It is much easier to work with cold dough; it doesn’t become sticky and unmanageable. Not to confuse you, but there is such a thing as a dough that is too cold; it can be impossibly stiff and difficult to roll out. If it has been in the refrigerator for a while, let it rest at room temperature for 10 to 20 minutes, until malleable. If dough warms in the rolling process, return it to the refrigerator (placed on a parchment-lined a cookie sheet if necessary) to chill a before proceeding. When cold pastry hits the hot oven, the fat melts and turns to liquid, creating pockets of steam. At the end of baking, the liquid evaporates, but leaves behind layers of dough that give the pastry its crisp flakiness. To keep the pretty crimps in place, freeze the pie or pie shell for 30 to 45 minutes before baking.
2. Handle the dough as little as possible. Flour plus water equals gluten, which creates the strands of dough that stretch and trap air as bread rises. In pastry, gluten is the enemy, but you’ll need some to give pastry dough structure. The more you work the dough, the more you develop gluten. Not only will your pastry be tougher, but it will also probably shrink once it bakes. Not a catastrophe, but paying attention to this finer point will make your efforts more rewarding. Resting and chilling the rolled dough before baking also prevents shrinking. (see no. 3, below)
3. Give the dough a break. After you make pie dough, give it a little rest (15 minutes) in the refrigerator to “hydrate” the dough. It takes flour a little while to thoroughly absorb water (ever noticed that pancake batter thickens as it sits?) Dough is more malleable when the flour has absorbed the water. Also, once you’ve rolled your pastry, give it a few minutes to relax. The gluten (see above) unwinds a bit, and your pastry won’t shrink in the oven. If you do this in the refrigerator or freezer, you will efficiently combine resting and chilling.
4. Bake until the pastry is well browned. It’s truly disappointing to have a soggy crust, and that’s what happens if you’re impatient. A bit of sugar in the dough will caramelize and help it turn a beautiful deep, golden-brown color, so keep your shirt on and let it happen.
5. Use a silicone pastry mat or an old-fashioned pastry cloth. These are great secret weapons, no matter how many pies you’ve made. It saves body and mind from frustration. (The only time I heard my mother swear was when she made pie dough. This from a woman who would wash your mouth out with soap if you said ‘jeez’.) Also, a mat protects the dough from absorbing unwanted flavors, e.g., onion and garlic, when you roll it out on your all-purpose wooden cutting board.
Ingredients
1. Flour: Let’s not complicate it. Use all-purpose flour. I usually use King Arthur because it’s local-ish, but Gold Medal is a good option. AP flour has enough gluten to give the dough structure without making it tough. It saves you from having too many kinds of flour in your cupboard so you can make a pie at the drop of a hat. Doesn’t that sound like fun? You’ve got this with a little practice, I promise.
2. Butter: I always use unsalted butter, so you can decide the amount of salt in the dough. It should be cold no matter which method you use to mix it into the flour.
3. Salt: You must use it! Without it your crust will be bland.
4. Sugar: If you’re making a sweet pie, it will help the crust brown. Omit it if you are making a savory pie.
5. Ice water: Cold water keeps the butter intact when you mix the dough, so it doesn’t become too soft and lose its power to melt in pieces and release steam.
Quick and Dirty Pie Dough in a Food Processor
Makes enough for 2 (9- to 10-inch) single-crust pies or 1 (9- to 10-inch) double crust pie Note:This recipe gives you plenty of dough to work with. You may have extra trimmings, so bake them with a little cinnamon and sugar for your kids’ treats. Well wrapped in plastic, the dough will keep in the freezer for up to 3 months. Defrost in the refrigerator for several hours or overnight.
INGREDIENTS
3 1/2 cups (420g) all-purpose flour
2 tablespoons sugar
1 teaspoon fine salt
1 cup (8 ounces, 2 sticks, 226g) cold, unsalted butter, cut into 1/2-inch cubes
8 to 12 tablespoons ice water, or more, as needed
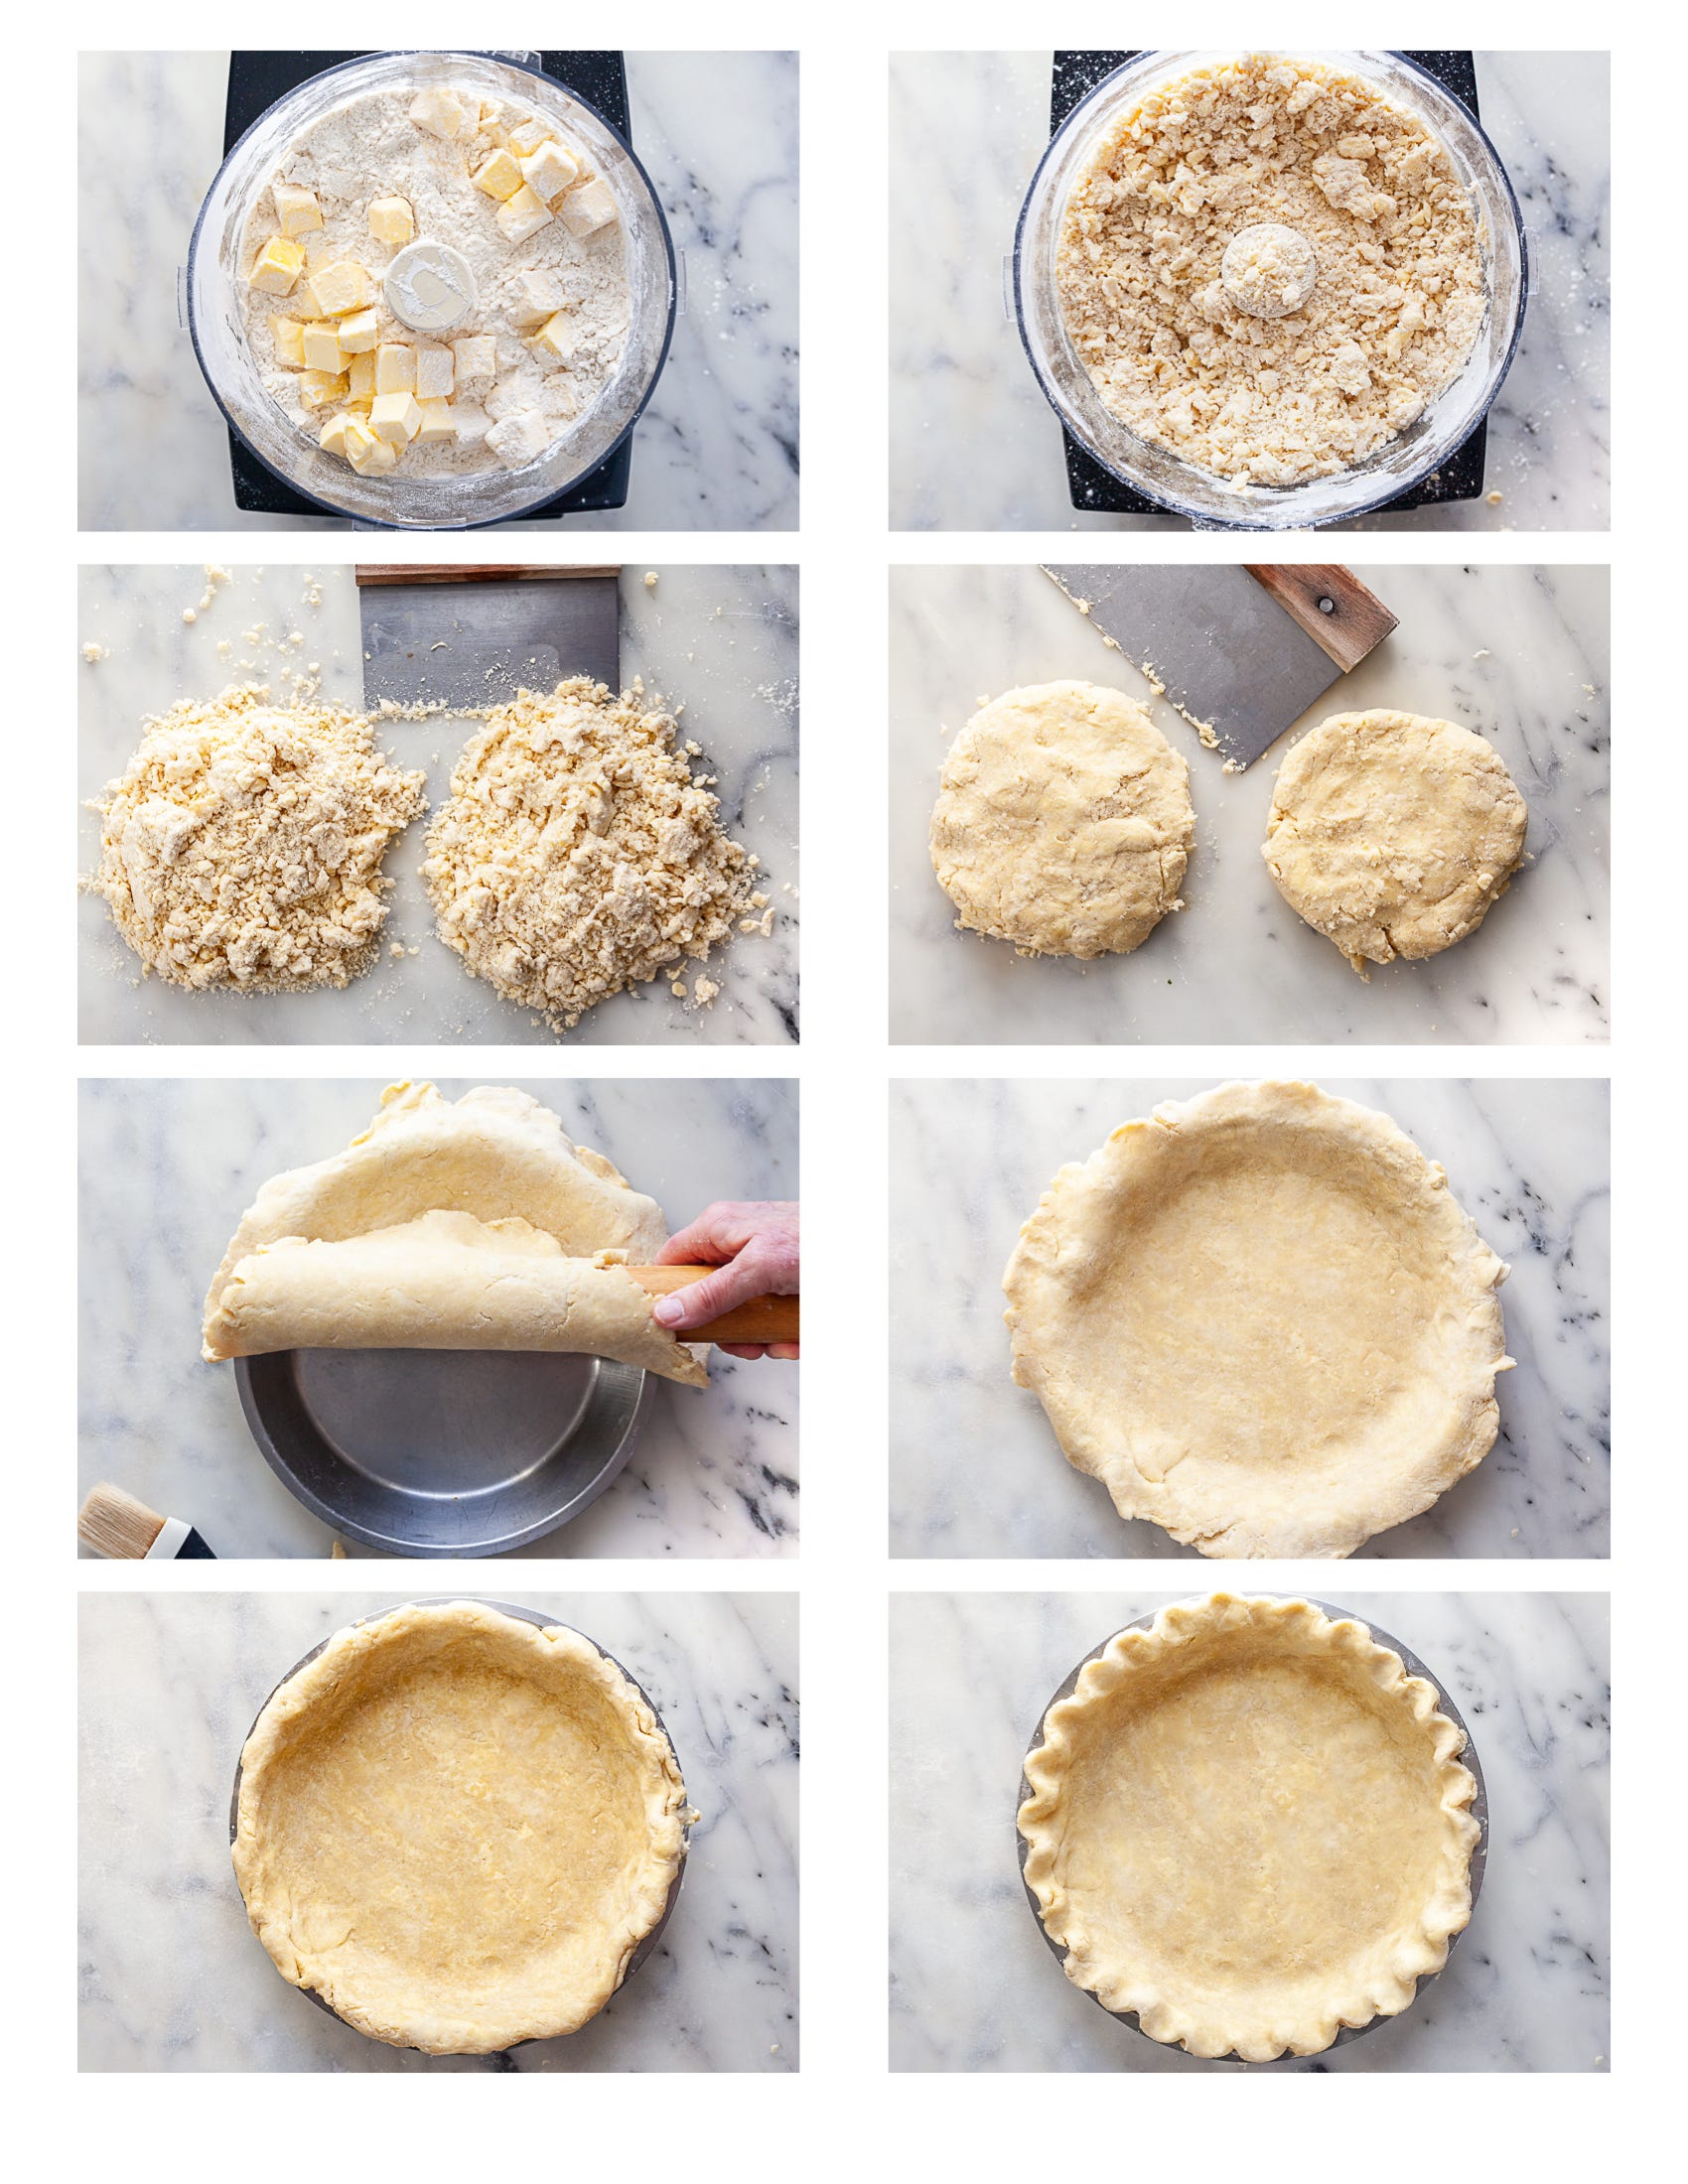
1. In a bowl or plastic bag, mix the flour, sugar, salt, butter cubes to combine, separating the butter cubes. Freeze for 20 minutes.
2. Transfer the chilled ingredients to the bowl of a food processor. Pulse 8 to 9 times, or until the butter is the size of lima beans. (They will become smaller when you add the water.)
3. Drizzle 8 tablespoons of the ice water on top. Pulse 3 to 4 times. If the dough looks dry, sprinkle in more water, 1 tablespoon at a time, pulsing after each addition until a small handful of dough crumbs comes together without cracking when you squeeze them. Flour has different levels of moisture depending on its storage conditions, so you will have to guesstimate, but practice will help.
4. Tip the contents of the food processor onto a work surface and make 2 even piles. Without kneading, press and squeeze the piles into 2 flat, round disks. Enclose each in plastic wrap and refrigerate for 30 minutes, or or up to 3 days. This allows the dough to hydrate.
5. Remove the dough from the refrigerator. If it feels stiff, let it sit out at room temperature for 10 to 15 minutes before rolling. The dough can be frozen, wrapped in plastic wrap, for up to 3 months. Defrost in the refrigerator
For a one-crust pie:
1) On a lightly floured surface or between 2 sheets of parchment paper, roll one disk into a 12-inch circle that is about 1/8-inch thick. Transfer it to the pie pan and press gently to fit it into the sides and bottom. With scissors, trim the edges if they are uneven, leaving about a 1-inch overhang. Fold the overhanging dough underneath itself so that the dough is even with the outside edge of the pan.
2) Crimp or press with a fork. Cup your hands around the dough edges to make sure they are not hanging over the rim.
3) Freeze for 30 minutes, or up to 3 months, well covered in plastic. Fill and bake.
For a double crust pie
1) On a lightly floured surface or between 2 sheets of parchment paper, roll one disk into a 12-inch circle that is about 1/8-inch thick. Line the pie pan with the dough and trim the pastry so that it is even at the edge. Mound the filling in the pie pan.
2) Roll out the second disk into a 13-inch circle and lay it gently on top of the fruit. With scissors, trim the excess overhanging pastry, leaving a 1-inch border all around. Tuck the border under the bottom crust and crimp or press the edges with a fork.
3) Freeze the pie for 45 minutes to set the crust. Bake as directed.
Extra Flaky Go-the-Distance Pie Dough
Makes enough for 2 (9- to 10-inch) single-crust pies or 1 (9- to 10-inch) double-crust pie
Note: This method is a version of the ‘rough puff pastry’ that we made in the restaurant with butter pats in the huge floor stand-mixer. It has also been touted recently by other pastry chefs. You can see Stella Parks’ version over on Serious Eats. You may have extra trimmings, so bake them with a little cinnamon and sugar for your kids’ treats. Well wrapped in plastic, the dough will keep in the freezer for up to 3 months. Defrost in the refrigerator for several hours or overnight.
Prep time: 20 minutes Chill time: 50 minutes
INGREDIENTS
3 1/2 cups (420g) all-purpose flour
2 tablespoons sugar
1 teaspoon fine salt
1 cup (8 ounces, 2 sticks, 226g) cold, unsalted butter, cut into 1/2-inch cubes
14 to 18 tablespoons ice water, as needed
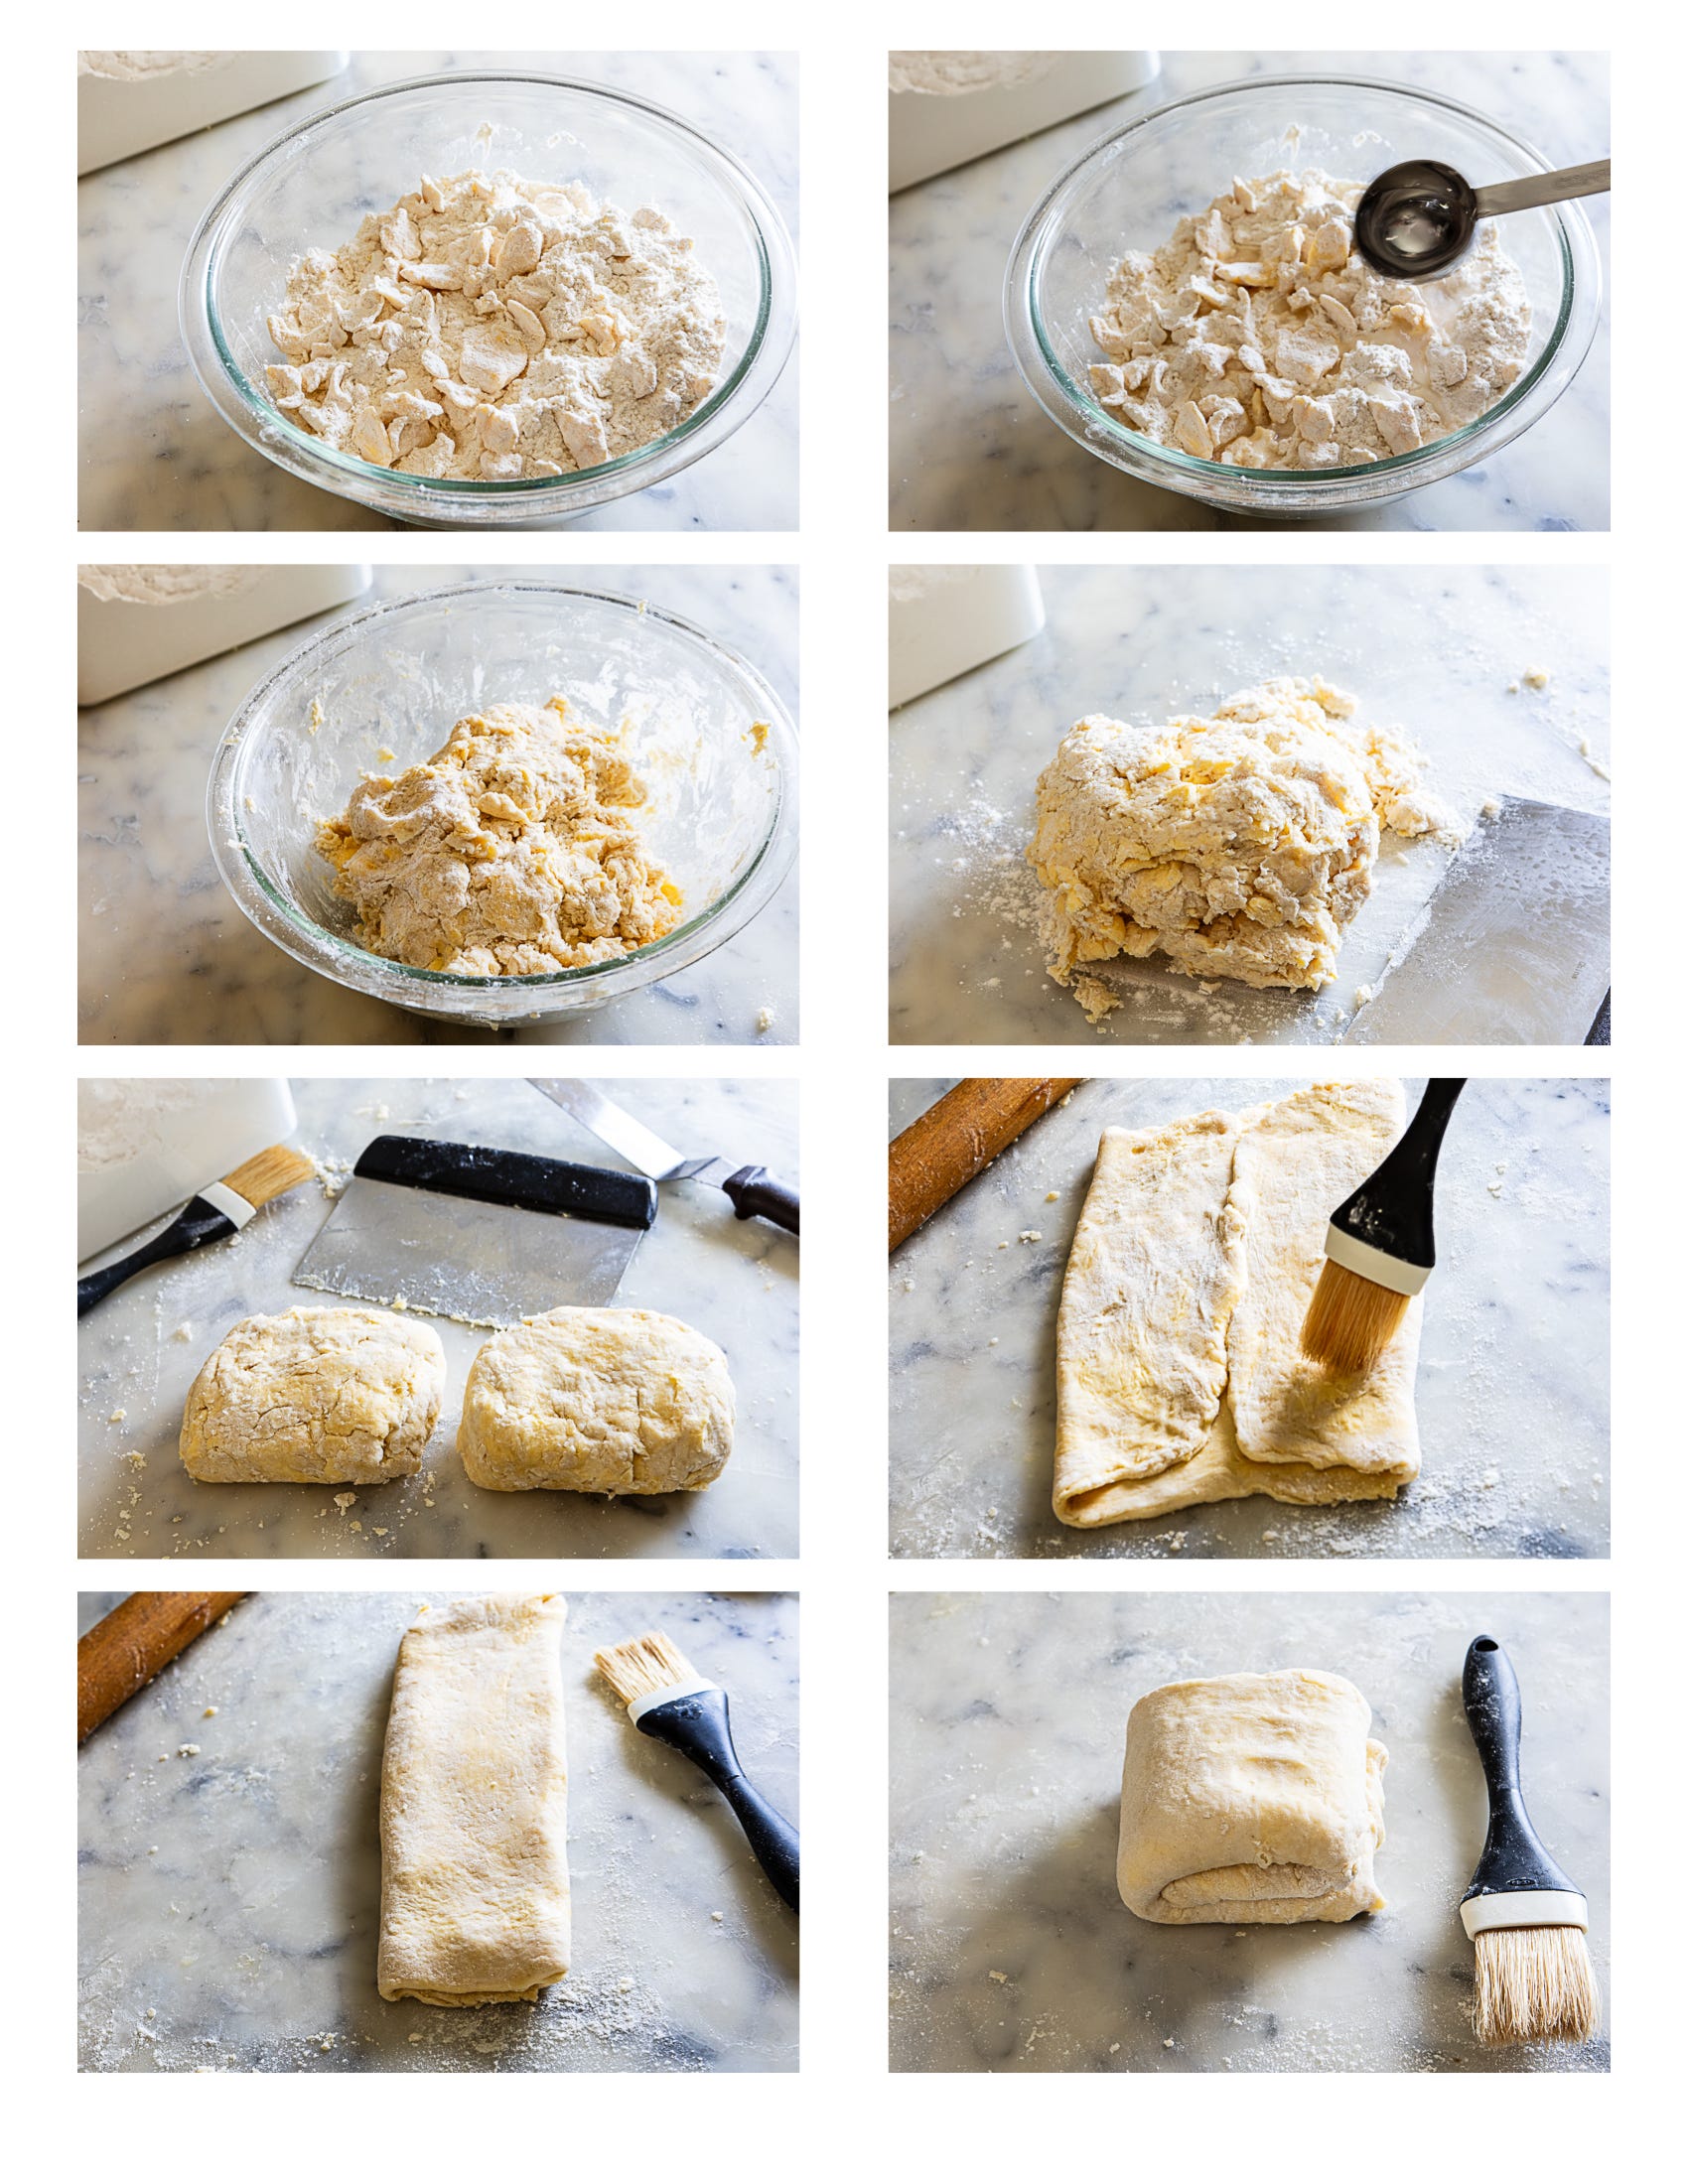
1) In a medium bowl, stir the flour, sugar and salt together. Distribute the butter over the dough and squish the cubes with your thumb and forefinger to flatten them. Toss them in the flour. The mixture should have nickel-size cornflake-like flakes. The flakes don’t have to be all the same size, but in that ballpark. (You can also do this in a mixer bowl with the paddle attachment if you like.) Place the bowl in the freezer for 20 minutes.
2) Drizzle 14 tablespoons of the ice water over the butter and flour mixture. Hold the bowl with one hand, and with the other, stir and toss the dough until it looks shaggy and starts to clump together. If the bottom of the bowl looks dry, sprinkle in more water, 1 tablespoon at a time.
3) Empty the contents of the bowl onto a work surface and make 2 even piles. Press and pat the piles into 2 flat squares. Enclose each tightly in plastic wrap and refrigerate for 15 minutes or up to 3 days.
4) Remove the dough from the refrigerator.
5) One square at a time, on a generously floured surface or between 2 sheets of parchment paper, roll the square into a x- by x-inch rectangle that is about 1/4-inch thick.
6) Fold the 2 short edges of the rectangle in towards the center so they meet. Fold in half again so you now have 4 layers in a thin rectangle. Fold the bottom edge 1/3 of the way up and fold again to meet the top edge. Brush off extra flour along the way with a dry pastry brush. Wrap in plastic and chill for 10 minutes to allow the dough to relax.
7) Roll out as directed in your recipe
How to Blind Bake a Pie Shell
1. Preheat the oven to 350 degrees. Have on hand a rimmed baking sheet.
2. Roll out the dough and fit it into the pie pan. Crimp the edges. Freeze for 30 to 45 minutes, or until firm.
3. Crumple a large piece of parchment paper and fit it into the pie pan. Fill it to the brim with pie weights, dried beans, or sugar (all can be saved for future use.) Push the weights all the way to the sides of the pan to prevent shrinking. Set the pan on the baking sheet.
4. Bake for 15 to 16 minutes, or until the edges look set and are beginning to brown.
5. Remove the pie from the oven and carefully lift the parchment and pie weights out of the pan. Prick the bottom with a fork in several places.
6. For a fully baked crust, return the pan to the oven for 14 to to 15 minutes, or until brown and crisp. For a partially baked crust (for pies like pumpkin, pecan or quiches that will be baked again) bake for 7 to 8 minutes, or until the bottom crust is just beginning to brown. If the dough puffs up, prick it again with the tines of a fork.

All-American Apple Pie (with or without berries)
DOUGH
1 recipe Quick and Dirty Pie Dough or Extra-Flaky Pie Dough
FILLING
5-6 peeled and cored baking apples (Honeycrisp, Empire, Cortland, Braeburn), sliced 3/8 inch thick
2 tablespoons freshly squeezed lemon juice
1/2 cup packed light brown sugar
1/4 cup flour
1 teaspoon ground cinnamon
1/2 teaspoon nutmeg
1/2 teaspoon salt
Optional Add: 1 1/3 cups cranberries or 1 1/3 cups blueberries, fresh or frozen
2 tablespoons unsalted butter
1 egg, beaten with 1 tablespoon cold water
2 teaspoons granulated sugar (for sprinkling)
1. In a large bowl, toss the apples with the lemon juice, brown sugar, flour, cinnamon, nutmeg, and salt. Stir in the cranberries or blueberries if using.
2. On a lightly floured surface or between 2 sheets of parchment paper, roll the one disk of dough into a 12-inch circle that is about 1/8-inch thick. Line the pie pan with the dough, and trim the pastry so that it is even at the edge. Mound the filling in the pie pan. Dot it with small pieces of the butter.
3. Roll out the remaining dough into a 13-inch circle and lay it gently on top of the fruit. With scissors, trim the excess overhanging pastry, leaving a 1-inch border all around. Tuck the border under the bottom crust and crimp or press the edges with a fork.
4. Freeze the pie for 30 to 45 minutes to set the crust.
5.. Center an oven rack in the oven. Preheat the oven to 425ºF.
6.. With a fork, thoroughly beat the egg with 1 tablespoon of cold water. Brush it over the pie, including the edges. With a sharp paring knife, cut 5 or 6 1-inch vents on top. Sprinkle with sugar.
7. Place the pie on a baking sheet. Bake for 20 minutes. Reduce the heat to 375ºF and bake for another 35 to 40 minutes, or until the crust is brown and the filling bubbles. (Total baking time is about 55 to 60 minutes.) If the crust browns before the filling bubbles, cover loosely with foil. The pie is best served on the day it is made, but leftover pie is especially good reheated in the oven and for breakfast, of course! That’s the way we roll in our house!
Happy Fourth! I hope you relax, eat some pie (don’t forget the ice cream), and forget about our troubles for this one day. We’re in this together! Even if we all just eat pie on the fourth day of July.
Until next time…"
XXOO
Sally
Thanks for reading, sharing, and subscribing. If you enjoyed this post, please share and click on the little ❤️ below ⬇️ I appreciate your being here and I love hearing from you if you have questions or suggestions. Tell your friends and aunties. I’ll be back with more soon!
Thank you so much, Sally, and Happy Fourth!
This is exactly the pie crust tutorial I need.
Bring on the summer fruit. There be pies!